
Welcome to the Deep Level Editor Documentation page. Find the important information in one place.
Contents
- Getting started
- Creating a level
- Game Modes
- UI Elements
- Tiles
- Level publishing
- Errors and error messages
- Shortcuts
- Updates
Getting Started
To start, open Deep the Game through Steam. When the main menu opens, click on “Play” and click the “Workshop” button in the lower right corner. There you can select “Load Level” to load a finished level into the editor or select “New Level” to start a level from scratch. You can also play community-made levels by clicking on the “Workshop” button and playing some subscribed levels. Make a new level and you will see the following screen:
Creating a Level Added in 5.2.0
When you create a new level, you will be brought up to the “Create a level” menu screen where you can edit level’s properties.
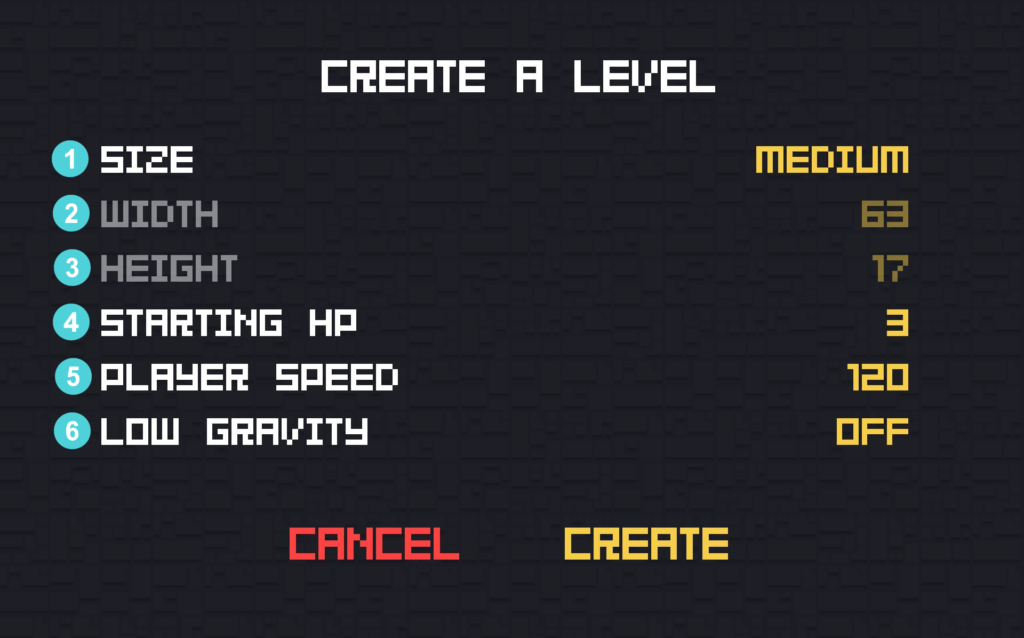
1 – Size – Pick your level’s size. You can use the level sizes found in Deep’s official chapters or use custom width (2) and height (3). Premade sizes are Small 30 x 17 (Found in Levels 1 – 10 in any chapter with some exceptions), Medium 63 x 17 (Found in Levels 11 – 19 in any chapter), or Large 144 x 17 (Found in Levels 20 in chapters I and III)
2 – Width – Number of tiles that the level spans in the X (horizontal) direction. It is automatically updated by the Size option, or it can be a custom value (Min 2, Max 200).
3 – Height – Number of tiles that the level spans in the Y (vertical) direction. It is automatically updated by the Size options, or it can be a custom value (Min 2, Max 200).
4 – Starting HP – The number of HP the player has at the beginning of the level. The HP can change if the player picks up a Health Item. Ranges from 1 to 3. The default value is 3.
5 – Player Speed – Player’s speed in pixels per second. Ranges from 20 to 300. The default value is 150.
6 – Low Gravity – Enables or disables the low gravity mode. It slows the player’s falling speed. The default value is off.
Properties set in this menu cannot be changed after the level has been created.
Game Modes Added in 5.5.0
When creating your level, you can select the game mode of that level. Each mode has different gameplay mechanics, special tiles and other unique properties that are described in the following text.
Story Mode
Story game mode is the traditional playing mode found in most of the levels in official Chapters.
Unique tiles:
None
Restricted tiles:
None
Other restrictions:
None
Requirements for preview and publish:
- 1x Player
- Min. 1x Finish
Goal: Find your way to the finish.
Survive
Survive is a endless game mode where enemies spawn each wave and your goal is to kill them without loosing much health.
Unique tiles:
- Bat Spawner
- Slime Spawner
Restricted tiles:
- Bat
- Patrol guy
- Slime
- Finish
Other restrictions:
- Starting HP is locked at 3.
Requirements for preview and publish:
- 1x Player
- 1x – 16x Slime Spawner
- 1x – 8x Bat Spawner
Goal: Kill as many enemies to reach higher waves.
PvP (or Local Multiplayer)
PvP (or Local Multiplayer) is a game mode where you can battle against your friends on a local machine in a custom environment.
Unique tiles:
- Player 2
Restricted tiles:
- Box
- Bat
- Patrol guy
- Slime
- Finish
- Coin
Other restrictions:
- Level’s size is locked at 20 x 13.
Requirements for preview and publish:
- 1x Player
- 1x Player 2
Goal: Fight against your friends and win the match.
Fire Escape (or Arcade Mode)
Fire Escape (or sometimes Arcade Mode) is a playing mode similar to the Story Mode, but there is a constant threat of burning from the fire that is rising as the times goes by. This mode can be found in the 20th Level of Chapter II.
Unique tiles:
None
Restricted tiles:
None
Other restrictions:
None
Requirements for preview and publish:
- 1x Player
- Min. 1x Finish
Goal: Find your way to the finish in time.
Treasure Hunt
Treasure Hunt is a game mode exclusive to levels made in the editor or levels downloaded from the Workshop. You have to search through the level to find all gold and coins hidden in the passages and tunnels.
Unique tiles:
None
Restricted tiles:
- Box
- Finish
Other restrictions:
None
Requirements for preview and publish:
- 1x Player
- Min. 1x Coin
Goal: Collect all coins in the level.
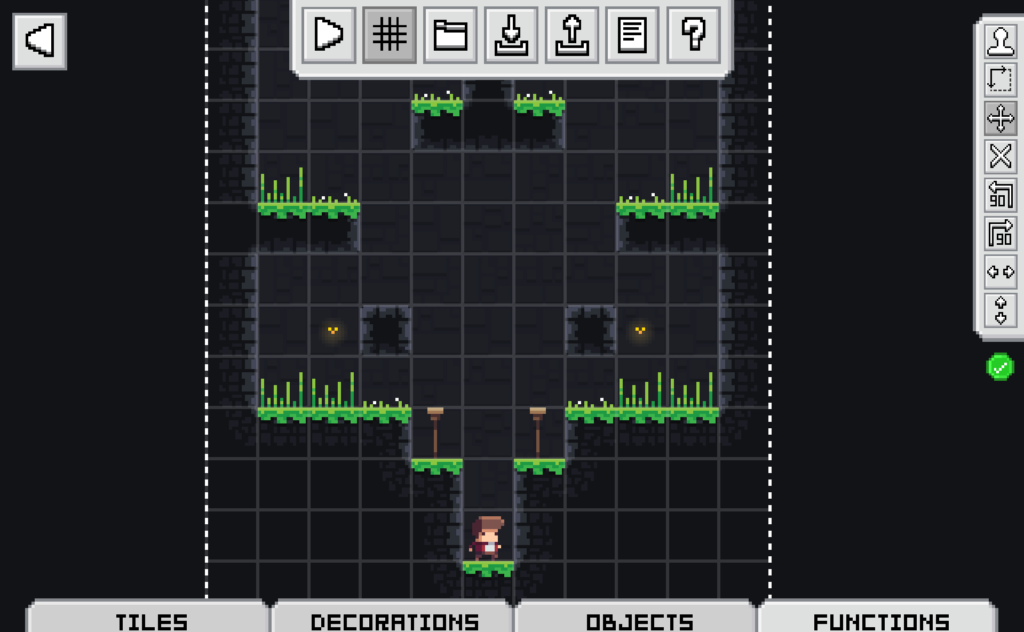
UI Elements
Here is a detailed explanation of every component of UI.

1 – Tile menu – The Tile menu is used when using the Stamp tool. Select which tile you want to stamp and use it on the canvas.
2 – Tool menu – Pick which tool you want to use on the canvas or modify selected tools.
3 – File menu – This menu is used for general file management.
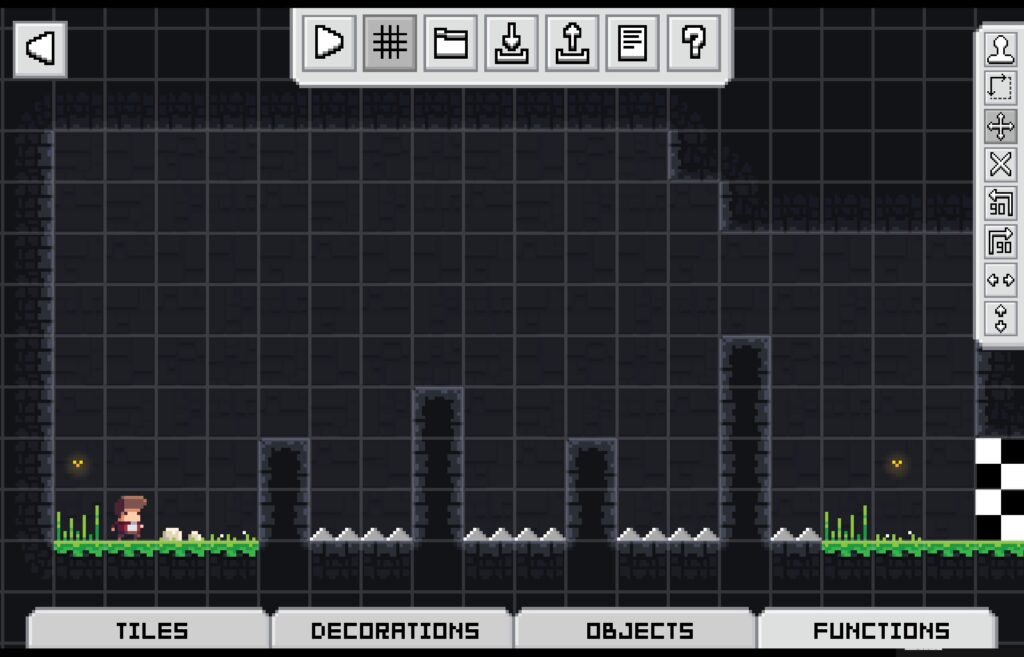
Tile menu
This menu is used to select which tile you want to use with the Stamp tool. It can be opened by hovering over the categories in the lower part of the screen. It has 4 categories: Tiles, Decorations, Objects, and Functions. Here is how they look in the editor:
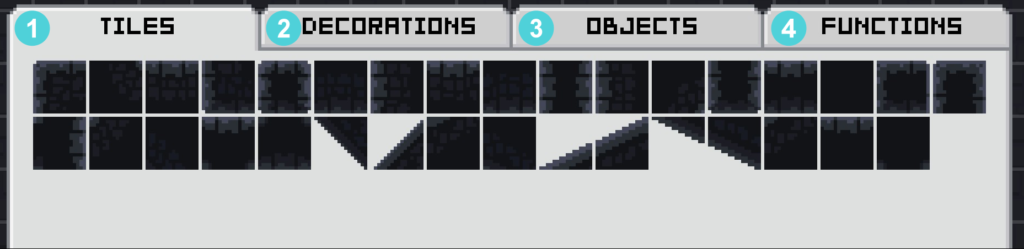
1 – Tiles – These blocks build up the foundation of the level. Each of them can be rotated or flipped with the Rotate or Horizontal/Vertical Flip.
2 – Decorations – These are decorative tiles used to make your level pretty and visually appealing. Added in 5.2.0
3 – Objects – These are some miscellaneous items such as boxes, bombs, enemies, or bridges.
4 – Functions – These items are used for the technical aspect of the level or for player modifications.Enemies – These are all the entities and blocks that can deal damage to the player. Removed in 5.2.0
Tool menu
This menu is used to equip a tool for editing the canvas.

1 – Stamp Tool – This tool is used to place tiles on the canvas (Left-click).
2 – Move Tool – This tool is used to move across the canvas. It is equipped while holding space.
3 – Delete Tool – This tool can delete tiles on the canvas. You can also delete tiles with the right-click.
4 – Rotate 90° counter-clockwise – Rotates the current tile 90° counter-clockwise.
5 – Rotate 90° clockwise – Rotates the current tile 90° counter-clockwise.
6 – Flip Horizontal – Flips the current tile horizontally.
7 – Flip Vertical – Flips the current tile vertically.Zoom out – Take a look at your whole level. Useful for taking screenshots and planing. Removed in 5.2.0
File Menu
This menu is used for general file and editor management.

1 – Preview level – Preview the level you are currently making. This can be also done with the F5 key
2 – Toggle grid – Toggles the grid on the canvas.
3 – Open a level file – Opens a level saved on the PC Modified in 5.0.0
4 – Save as a level file – Saves the level to the PC
5 – Publish a level file – Publishes the level to the Steam Workshop Added in 5.0.0
6 – Update level properties – Change some properties like level size, speed, etc. Added in 5.2.7
7 – Open the documentation – Opens this documentation page Added in 5.0.0
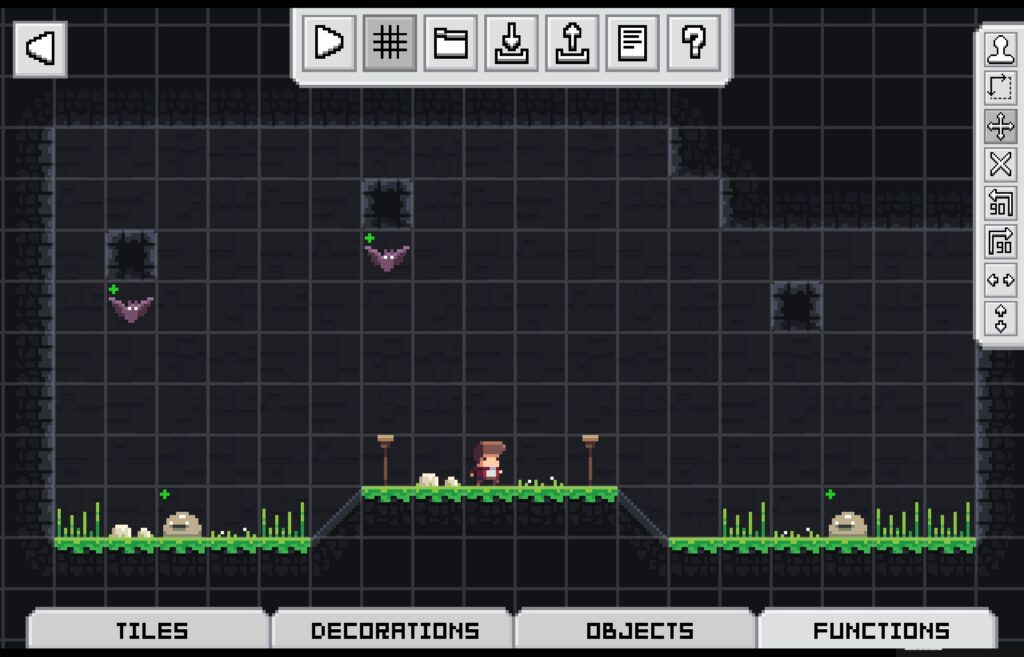
Tiles
Here is an overview of all tiles currently available in the level editor:
Tiles
These are pretty straightforward: They build the basic layout of each level. There are 32 tiles and they are all solid.
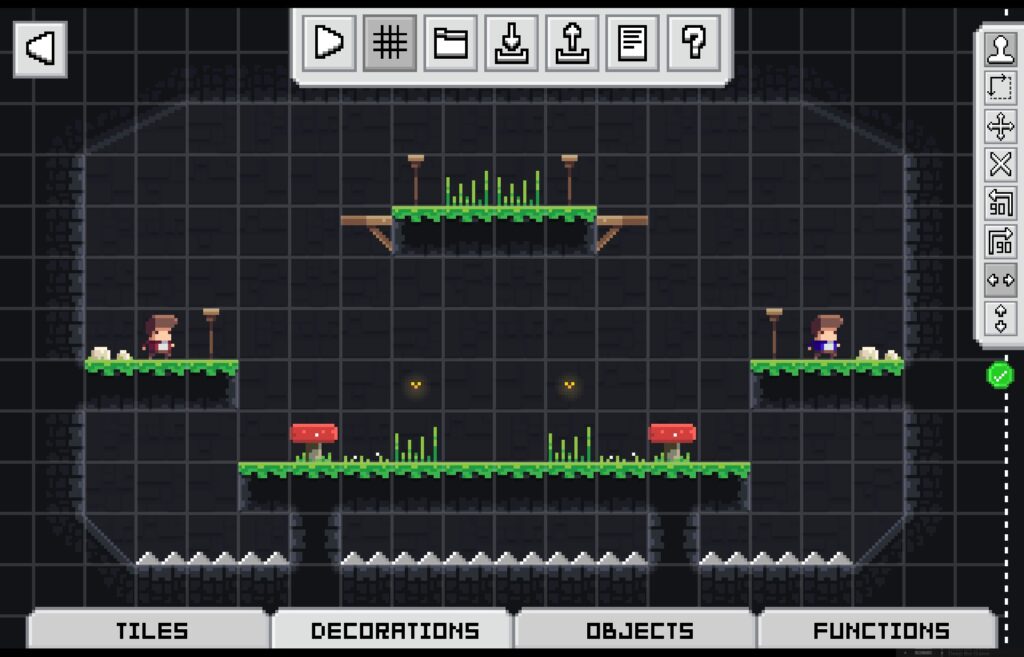
Decorations Added in 5.2.0
These are all the decorative tiles that can make your level more visually appealing. Here are all of them:
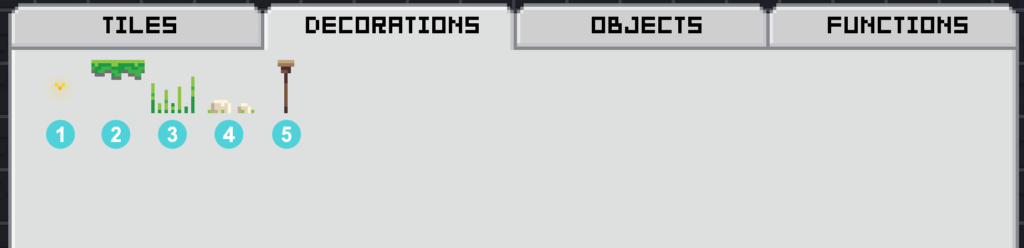
1 – Fly – A small decorative fly that flies around the placed position.
2 – Grass – A decorative block that can be placed on top of other tiles. Its located on layer 2.
3 – Tall Grass – A decorative block that waves when the player passes nearby. Best used with the grass block.
4 – Rocks – Small decorative tile best used on top of the grass block.
5 – Torch – 2-block-high decorative object.
Objects
Objects are misc tiles that can be platforms or destructible objects. Here are all of them: (These may differ in different modes)
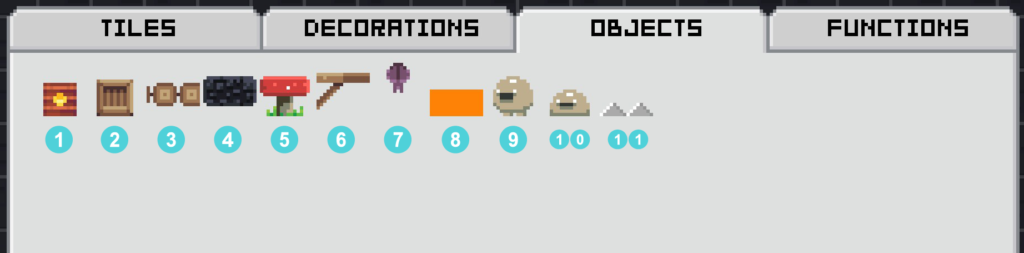
1 – Bomb – When destroyed creates a fire. It can be jumped through.
2 – Box – When destroyed creates a fire, a coin, or a hearth (random). It can be jumped through.
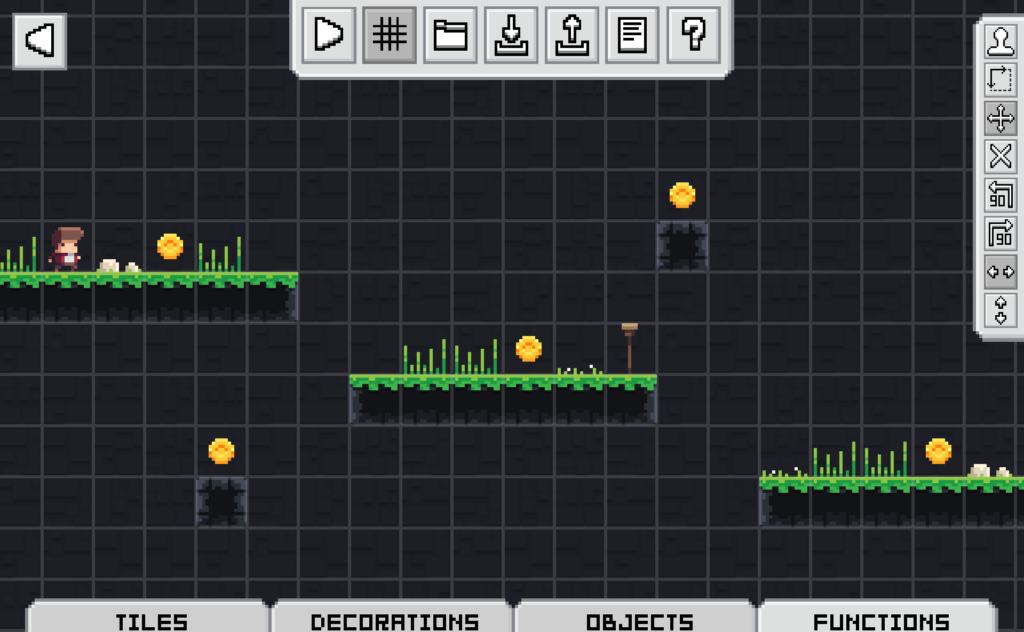
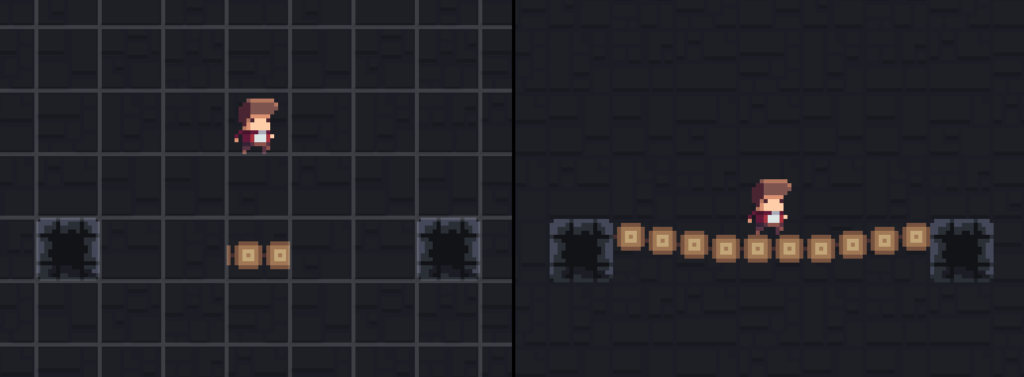
3 – Bridge – The central part of the bridge. Place this tile and leave 2 tiles left and right empty for the bridge that spawns there. See the image below.
4 – Weak Block – They act like a tile, but when stepped on they shake and break. Avoid placing them next to tiles or entities.
5 – Mushroom – An object that boosts player’s jump.
6 – Platform – An platform that can be put on walls. It can be jumped through. It can be rotated.
7 – Bat – Bat can be placed under a tile. You can find a bat’s behavior in official chapters.
8 – Fire – This tile hurts the player if he collides with it. Looks different in preview
9 – Patrol Guy – Patrol guys can be placed on a tile. Their distance is fixed to 100 points (this may change). You can find a patrol guy’s behavior in official chapters.
10 – Slime – Slime can be placed on a tile. You can find a slime’s behavior in official chapters.
11 – Spikes – This tile hurts the player if he collides with it. They can be rotated.
Treasure – When destroyed creates a coin. It can be jumped through Removed in 5.0.0
Functions
Functions are the technical tiles of each level or tiles that affect the player. Here are all of them: (These may differ in different modes)
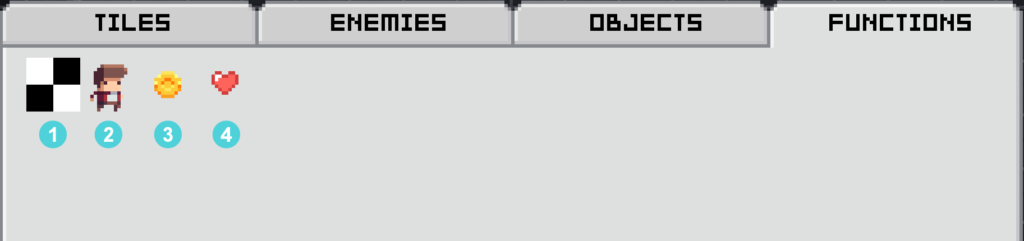
1 – Finish object – On collision with this tile, the level is completed. At least one is required to play a level.
2 – Player object – Tile which sets the spawn position of a player. At least one is required to play a level. Level can’t be played if there is more than one instance.
3 – Coin – Gives the player coin points. Currently doesn’t make an impact on gameplay.
4 – Heath – Heals the player with 1 HP.
Level publishing Added in 5.0.0
If you want to share your creation with the Deep comunity, you can publish your level to Steam Workshop where other people can subscribe to that level and play it in their client. Follow the following steps to successfully publish a level:
Publishing process
- Create your level – Use the blocks, objects and enemies explained in the previous paragraphs to build your level
- Make the level functional – Add a player block and at least one finish block.
- Verify the level – Preview your level and finish it by entering the finish blocks. You will know if the level is verified if a green check is visible under the Tool menu
- Enter information – When you click the publish button, you will be brought to the information screen. Please fill in the name, description, choose a thumbnail image (max 2 MB), and set its visibility. To understand the information menu, please look at the segment below.
- Publish – Click the publish level and wait until the level uploads.
Publish menu
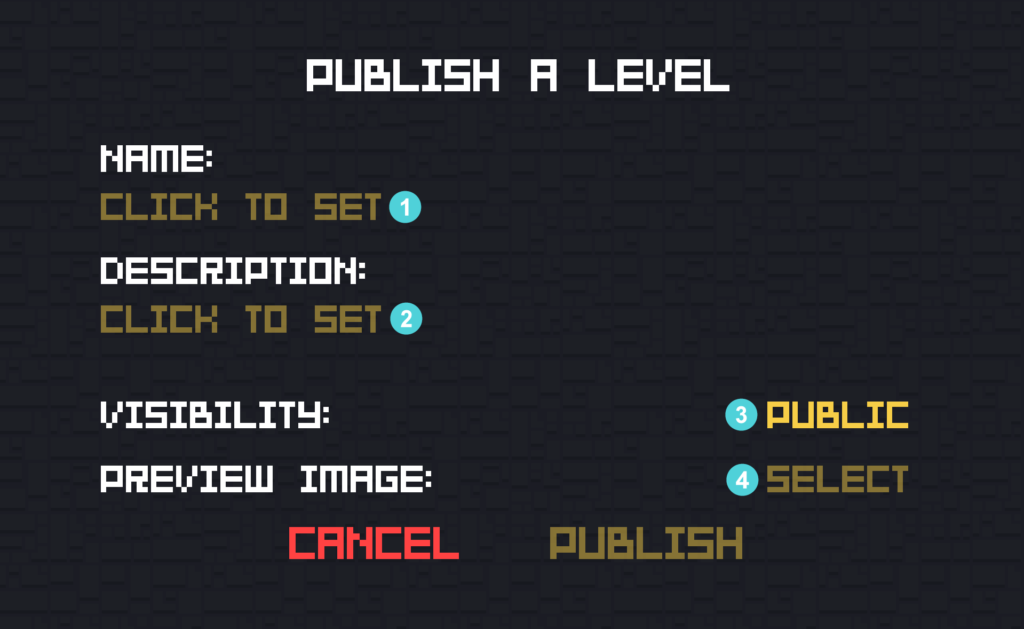
1 – Name – Set a name for your level. This will be displayed in the subscribed items list and on the Steam Workshop. This can be later changed on your Workshop page.
2 – Description – Set the description of your level. This is the text that will be located under the title and screenshots on the Workshop page. This can be later changed on your Workshop page.
3 – Visibility – Determines if your level will be publicly available, visible only to your friends or private. This can be later changed on your Workshop page. This can be later changed on your Workshop page.
4 – Preview image – This is the thumbnail that will be displayed on the Steam Workshop Discovery page. You can take a screenshot of your level by using the Zoom out tool (Ctrl + Numpad 0) in the editor.
Errors & Error Messages
If you encounter one of these messages or issues, these are the solutions:
- “ERROR: NO FINISH BLOCKS FOUND (MIN 1)” – Each level requires at least one finish object to be playable. Add it from the functions category with the stamp tool.
- “ERROR: NO PLAYER BLOCK FOUND (MIN 1)” – Each level requires at least one player object to be playable. Add it from the functions category with the stamp tool.
- “ERROR: MORE THAN ONE PLAYER FOUND (MAX 1)” – A level can’t contain more than 1 player object. Delete any extra player models to make the level playable.
- The level won’t load when loading it with the “Load” button – The level contains one of the messages above. Try to edit the level using the editor or contact the person who sent you the file.
- “THIS LEVEL CAN’T BE PUBLISHED YET. CHECK PLAYER AND FINISH BLOCKS” – The level is missing a player or a finish block or it has 2 or more player blocks. Added in 5.0.0
- “BEFORE YOU CAN PUBLISH, PLAY THROUGH THE LEVEL TO VERIFY IT” – Before the level can be published, it needs to be possible to play through. If the level is eligible to publish, you will see a green arrow under the Tool menu Added in 5.0.0
Shortcuts
The list of all shortcuts used in the level editor Added in 5.0.0
- Switch to Tiles – Ctrl + 1
- Switch to Objects – Ctrl + 2
- Switch to Player – Ctrl + 3
- Switch to Functions – Ctrl + 4
- Preview level – F5
- Return to the Editor – F6
- Toggle grid – Ctrl + G
- Open a level – Ctrl + O
- Save the level – Ctrl + S
- Save as the level – Ctrl + Shift + S
- Publish the level – Ctrl + P
- Open the documentation – F1
- Stamp Tool – B
- Move Tool – Space (hold)
- Move Tool (Select) – M
- Delete Tool – E
- Area Placement Tool – U
- Rotate 90° counter-clockwise – Ctrl + Arrow Left
- Rotate 90° clockwise – Ctrl + Arrow right
- Flip Horizontal – Ctrl + Shift + H
- Flip Vertical – Ctrl + Shift + V
- Exit to the menu – Esc
- Quick Equip – Mouse Middle Click Added in 5.2.0
Zoom out – Ctrl + Numpad 0Removed in 5.2.0
Updates
Find features that were newly added or updated
5.5.0
- Added game modes to the editor. When creating a level, pick between Story, Survive, PvP, Fire Escape, and the Treasure Hunt mode.
- Added the Area Selection Tool for mass block placements.
- 2 new tiles have been added – Short Grass Decoration and Ice.
- 3 new functional blocks have been added – Bat Spawner (Survive), Slime Spawner (Survive), and Player 2 (PvP).
- A new shortcut for the Area Selection Tool
5.2.7
- Added the possibility to update level’s properties after the level has been created.
5.2.0
- New decoration tiles have been added: Grass, Tall Grass, Fly, Torch, and Rock.
- A new “Create a Level” menu appears when creating a new level. There you can modify the level’s size or player properties such as starting HP, running speed, or the low gravity mode.
- Objects and Enemies tabs have been merged into Objects.
- The Zoom out option has been removed.
- A new shortcut has been added: Equip a tile you are hovering with the mouse middle click.
- Fixed a bug where hat skins wouldn’t destroy on death.
- The platform in the level editor has been raised by a few pixels.
5.0.0
- Added the following shortcuts: Switch to Tiles, Switch to Objects, Switch to Player, Switch to Functions, Toggle grid, Open a level, Save the level, Save as the level, Publish the level, Open the documentation, Stamp Tool, Move Tool (Select), Delete Tool, Rotate 90° counter-clockwise, Rotate 90° clockwise, Flip Horizontal, Flip Vertical, Zoom out
- Updated the “Open Level” icon in the File menu
- Added 2 new icons to the File menu: Publish the level and Documentation
- 2 new error messages before the level can be published (“THIS LEVEL CAN’T BE PUBLISHED YET. CHECK PLAYER AND FINISH BLOCKS” & “BEFORE YOU CAN PUBLISH, PLAY THROUGH THE LEVEL TO VERIFY IT”)
- The Treasure tile from the Objects tab has been removed.
- Level verification is now mandatory before the level can be published. If a level is verified, there will be a small green arrow under the Tool Menu.
- Other bug fixes and quality of life improvements